
The Moon is the most forgiving astrophotography target by far — it’s bright enough to shoot handheld in some cases, doesn’t require a dark sky, and is available most nights of the month. Getting real crater detail rather than a flat white disc comes down to a few specific settings and timing choices.
The ‘Looney 11’ Rule
A simple starting exposure for the Moon is the “Looney 11” rule: set aperture to f/11 and shutter speed to roughly 1 over your ISO value (for example, 1/100 second at ISO 100). This works because the Moon is a sunlit object in direct sunlight, similar in brightness to a sunlit daytime scene, which is why standard night-photography settings dramatically overexpose it into a blown-out white circle.
Timing: Skip the Full Moon
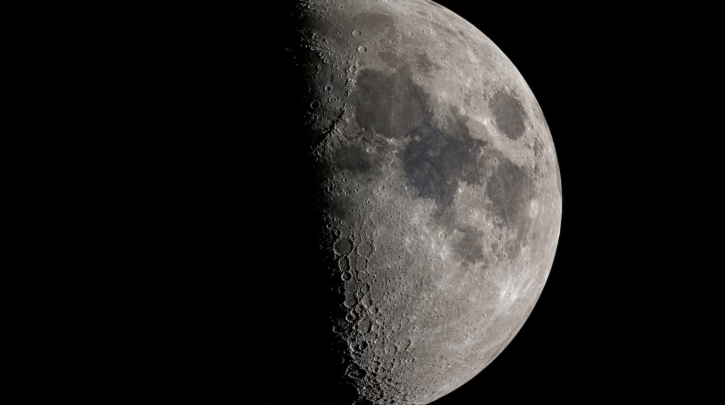
Counterintuitively, a full moon is one of the worst times to photograph crater detail, since direct, flat lighting washes out the shadows that give craters their visible depth. A half moon or crescent phase, photographed along the terminator — the line dividing lit and shadowed lunar surface — shows dramatically more three-dimensional detail, since low-angle sunlight casts long shadows across crater rims and mountain ranges right at that boundary.
Focal Length and Detail
The Moon is small in the sky relative to most camera lenses’ field of view, so more focal length directly means more detail. A basic telephoto lens around 300mm captures a recognizable Moon with some visible features, but a telescope used with a camera attached captures dramatically more crater and mountain detail than any standard camera lens can manage.
Shooting Through a Telescope
Attaching a camera to a telescope, called prime focus imaging, or holding a phone camera up to an eyepiece, called afocal or eyepiece projection, are both common ways to combine a telescope’s magnification with a camera’s image sensor. Afocal shooting through a phone works surprisingly well for the Moon specifically, since it’s bright enough to tolerate the light loss and minor optical compromises of shooting through an eyepiece rather than at prime focus.
Smartphone Moon Photography’s Limits
Some phones apply aggressive computational processing — sometimes called “space zoom” — to zoomed Moon shots, which can enhance detail using reference data in ways that go beyond what the camera’s optics actually captured. This has drawn some controversy over whether the result reflects genuine optical detail or partly composited enhancement. A telescope or a real telephoto lens avoids this ambiguity entirely, capturing detail that’s unambiguously what the optics resolved.
Stability Matters More Than for Wide Shots
Because lunar photography typically uses more magnification than wide-field shots, even small vibrations show up as noticeable blur. A sturdy tripod, a remote shutter or timer to avoid hand-shake from pressing the button, and waiting for calm air (atmospheric turbulence blurs high-magnification shots more than most other factors) all make a bigger difference than they would for a wide nightscape shot.
Smart Telescopes and Lunar Imaging
Because the Moon is bright, it doesn’t need the same live-stacking benefit that faint deep-sky targets do, but a smart telescope’s automated tracking still makes framing and capturing detailed lunar shots noticeably easier than manually adjusting a traditional telescope, especially at high magnification where the Moon can drift out of view quickly; see our smart telescope guide for how that automated tracking works across targets.
Processing Lunar Shots
Because the Moon is bright and detailed to begin with, lunar images often need less aggressive processing than deep-sky targets — modest sharpening and contrast adjustment usually brings out crater detail without needing the full stacking workflow used for faint nebulae; see our editing basics guide for how that lighter processing approach compares to deep-sky work.
A Good Beginner Project
Photographing the Moon through its phases over a full month, from thin crescent to full and back, is a genuinely rewarding beginner project that teaches exposure, focus, and timing without requiring a dark sky or any special travel — it’s available essentially every clear night somewhere in its cycle, making it one of the easiest ways to build real astrophotography skill before moving on to fainter, more demanding targets.
By the time you’ve captured a full lunar cycle, you’ll have a working feel for exposure, focus, and stability that carries directly into every harder target that follows.
Few other astrophotography subjects offer that much practical skill-building for so little required equipment or travel.